
the world's best player This page describes the strategy developed by Johnny Veliath, an excellent Styx player, the current World Champion. Johnny kindly offered to share his strategy with all other Styx fans. So, give it a try, and become world champion yourself. If you are interested in strategies of other Styx players, reference the Strategy page. If you have any good ideas yourself please contact us. We'll be more than happy to publish your playing suggestions on this web site. There are four sections on this page:
The stage is yours, Johnny:
I've developed a set of strategies which seem to work.... I've had pretty good results with them: As much as 98% coverage, using fairly little time and effort. My first strategy, the Principle Strategy, is most effective
with levels two and three. I once used a separate strategy of my own for
level one, but I think that the principle strategy will get you through
easier and faster. As for level four and above, the rapidly enlarging caterpillars make the use of my principle strategy rather difficult. I have, however, developed the beginnings of a strategy for those latter levels, and will include it here as well. This strategy has its roots in the principle strategy, but for the most part it is not the same. Please note that during my descriptions, I sometimes mention measurements in inches. These measurements were taken on a fifteen inch screen, and may differ if your screen is a different size. For a better indication, look at the images included with the strategy.
The Principal Strategy (Levels One, Two and Three) I consider this strategy very effective and quite fast compared to other methods I've tried. You can fill 95% and still get through quickly, although higher coverage -- I often get 98% -- is possible. 1. When you begin your game, start *at once* to build up a column from the center of the screen. It is important that you don't delay, because the two caterpillars (in levels 2 and 3) will start getting under foot, making you mess up your work in order to avoid them. You should have a column built up close to the top of the screen (leave enough room for the Styx to go back and forth with comparative ease) by the time the two caterpillars reach you (see diagram ps-1). In level one this is not as important, and if you want, you can go slowly and build everything in green. Regardless of level, the column you build should be wide enough that the Styx(es) cannot jump through it.
2. Once the column has been constructed, move around to the side without the Styx (levels 1 and 2). From the top of the screen build down a column, leaving about an inch or more of open space between the column and the edge. At the top of that space, construct a trap as shown in diagram ps-2. If you're in level three and there is a Styx on both sides, see my hints at the end for help.
3. a) Levels One and Two: In these two levels, you need not build anything else. You can now wait for the Styx to migrate into the side with your trap. If you want, you can hasten this by building columns on the other side and crowding him out, but since that is a rather risky business, I would only suggest it as a last resort. When the Styx finally goes through into the other side, almost close off the opening. It is important (in level two) to leave the other half of the screen un-filled, because it gives the caterpillars a longer perimeter to cover. If you want, you can fill the unused half of the screen with long, narrow columns to make the caterpillar's journey longer. To put it all in a nutshell, you must trap the Styx on the correct side by making it as hard as possible for him to get back over.
3. b) Level Three: In this level, because you have two Styxes, you must proceed as in step 2 for *both* sides of the screen. When complete, you should have two nearly identical traps, as shown in diagram ps-3b. Because there are two Styxes, it is not as important to almost close off the opening at the central column. Chances are that there will be a Styx on each side, but if there isn't, it won't take long for one of them to migrate over.
4. a) Levels One and Two: Once you have the Styx on the correct side of the screen, all that remains to be done for these levels is to wait for the Styx to enter the narrow space containing the trap. This is sometimes the longest wait, and you can't really do too much to make it faster, except try to crowd the Styx into the hole by building columns, or filling in spaces. Once the Styx is inside the space, you must trap him there in whatever way you choose without filling in the rest of the screen. If you happen to close off the opening by accident, you will end up with a 3- or 4K bonus. My method is illustrated in diagram ps-4a: A wide, vertical column blocking the opening.
4. b) Level Three: Proceed as in step 4a, except you must trap *both* Styxes before going on to step 5. Resist the temptation to segregate the first Styx before trapping the next because if you do so and you don't complete the level, you will be reduced to a crippling half speed for the rest of the level.
5. a) Levels One and Two: Once inside the narrow space, it will not be long before the Styx decides to explore your trap. Wait for the colour to turn green, then close off the opening!
5. b) Level Three: Proceed as in step 5a. If the first Styx you trap doesn't result in completion of the level, make your agonizingly slow journey to the other side of the screen and trap that Styx.
If you're now in level four, watching in paralysed horror as the caterpillars grow longer and longer, while the two Styxes seem to follow your every move... it is time to try out some STRATEGY! This strategy is not the safest one, nor is it the most foolproof
one, but in level four and above, I don't think any strategy can be
either safe or foolproof! In these levels, your greatest enemy is not
the Styxes, but the caterpillars. When you are trying to pass a
four-inch caterpillar, you become very vulnerable to the whirling
Styxes. If you don't have any protection, you are almost guaranteed a
quick but painful death. Having just been formulated recently, this strategy is still under development, but what I have created so far makes a very good beginning. In the future, a more refined version of the strategy may be published here.
1. As in my strategy for the first three levels, you must at once build up a column in the center of the screen. In these latter levels there is no time to worry about what colour of blocks you are making. Just be cautiously aggressive (if that's possible!). The root of this strategy involves getting both Styxes on one side. Therefore, you shouldn't build the column up all the way until you are sure you can trap both of them. When you have both on the same side, build the column up as close to the top of the screen as you can to prevent the Styxes from crossing back over. It is very important that the column is made too wide for the sneaky Styxes to jump across it (see diagram L4-1).
2. You should now have one side of the screen with two Styxes, while the other side should be completely empty. On the empty side, starting at the outside edge, build a series of columns down from the top. The object here is to increase the perimeter as much as possible, so you should make the columns long, and extremely narrow. Leave yourself about two inches of clear space between the center column and the columns you have just drawn to use whenever you must pass an oncoming caterpillar (see diagram L4-2).
3. Now that you've dealt with the caterpillars, you are faced with the really difficult part: You must try to build a trap for the Styxes while they are both whirling around you. This task is the downfall of my strategy, but I can see no other way out. So far, my most successful method involves building a column down from the top through the middle of the area with the Styxes in it, and trapping one Styx in it (see diagram L4-3). With luck, the level will be completed. More often than not, however, only that area will be filled in and you will be left with the other Styx to deal with. The important thing is that you will now be running at half speed. In previous levels, I viewed that as a handicap. In these levels, however, it is a great asset. In fact, your aim should be to get yourself down to half speed as soon as possible. The reason for my sudden change in attitude is that you can pass the caterpillars by filling up less space if you are going slower. In addition, when your speed is cut by half, the speed of the remaining Styx is halved as well. This makes it easier for you to build the next trap for him....
4. Your final task is to trap the remaining Styx. It is usually extremely difficult to trap him in less than 10% of the screen, so don't expect high bonuses. In these latter levels, I've gotten bonuses anywhere from 0K to 11K. The main factor which prevents you from getting high bonuses is that you don't have the time to wait. If you wait anywhere for more that thirty seconds, you will probably fall victim to one of the caterpillars. All you can do is build a quick trap (see diagram L4-4 for my suggested method), catch the Styx in it.... And then go back to step 1 to complete the next level!
--Jumping: The Styx can jump through columns that aren't very wide, so ensure that everything you build is wide enough, otherwise even the best laid strategies will go amiss. --Building Columns: When building a column in the presence of one or more Styxes, do it by making small, narrow blocks. The narrower the block, the faster you're going to get back to safe ground and the less time the Styx has to catch you. Once you've built the narrow column, you can quickly widen it by adding a strip to the side without the Styx. For a good example of this, see the columns built in the strategy for levels four and above. --Building Traps: When you're building traps for the Principle Strategy, make them according to how much patience and time you have: The narrower and longer you make the opening, the more time it will take for the Styx to enter. On the other hand, once he does enter, he will stay for a much longer time. If you're opening is wide and short, the Styx will make many quick visits to your trap, and you may have a hard time catching him in there when the colour is green. In addition, the Styx may catch you while you're trying to close off the opening. Of course, the size of the trap itself affects the amount of time the Styx will remain in it as well as the size of the opening. Generally, the larger the trap, the longer it will stay there. In my opinion, the traps shown in the Principle Strategy illustrate an approximation of the ideal proportions. --Speed: It is difficult to say exactly what speed is best. On my computer, speeds anywhere from 450 to 650 are quite effective for the Principle Strategy. In level four and above, however, I would suggest a speed between 600 and 700, or even 800. Unfortunately, you cannot alter the speed once you've started the game, so you must begin the game at the speed you want to finish it. A speed of 800, though very helpful when you're around level six, is extremely frustrating when you're waiting for the Styx to enter your trap in level one. All I can say is, try a few games and pick the speed you are most comfortable with.
|
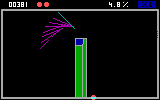 ps-1
ps-1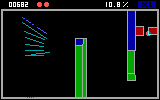 ps-2
ps-2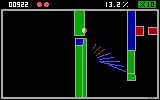 ps-3a
ps-3a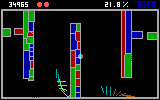 ps-3b
ps-3b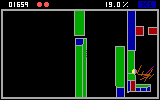 ps-4a
ps-4a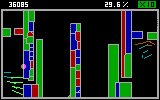 ps-4b
ps-4b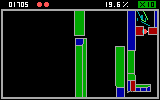 ps-5a
ps-5a ps-5b
ps-5b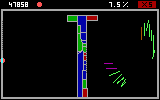 L4-1
L4-1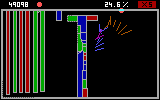 L4-2
L4-2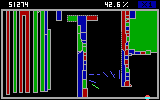 L4-3
L4-3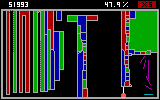 L4-4
L4-4